1. Once back inside the Develop module you will notice that things have changed a bit from what you normally see. Inside the ‘Treatment’ drawer of the ‘Basic’ panel “Black & White” is highlighted.
2. Things don’t look out of place inside the ‘Tone’ drawer; but just below, within the ‘Presence’ drawer now only the ‘Clarity’ slider is active and available for you to make adjustments. Both ‘Brightness’ and ‘Saturation’ are grayed-out and inactive because both these settings affect the color of an image. You are now working in an environment adapted for editing a photograph set to be rendered here as a monotone image.
The setup has changed just a bit; but remember, your Raw file (or DNG conversion) still has all the original color data recorded when you made the picture in your camera set to "Raw".
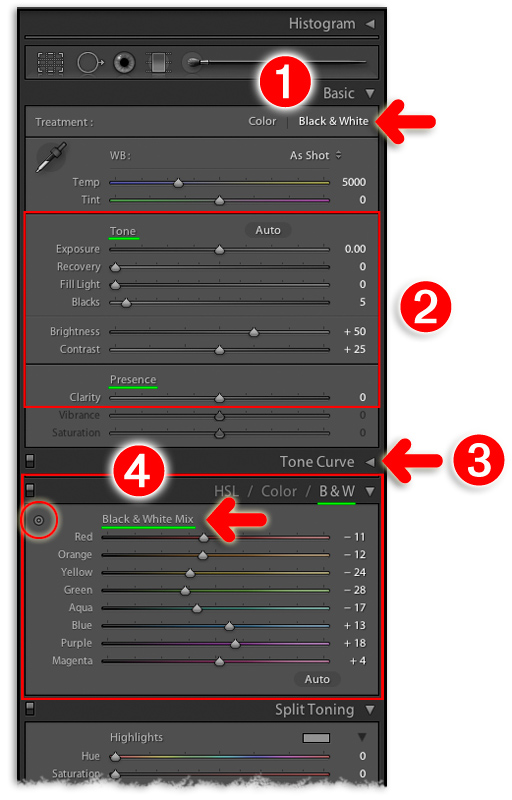
3. You are still able to set a custom Tone Curve if you choose.
4. But instead of having separate Hue, Saturation and Luminance sets available for tweaks within the ‘HSL’ panel as usual – all settings that affect the color rendering of an image – once again, because we are working in B&W the sliders provided now affect the luminance value (brightness or darkness) of this color spectrum that is a part of what our cameras capture when making a Raw file.
You may likely find helpful the “target” tool beside the “Black & White Mix” title here.
After clicking on it to make the tool active, place your cursor over an area of your photograph that is too dark or is overly bright. Then, by clicking on that spot while holding down your cursor, move up to brighten, down to darken the image. You are affecting the color data baked into your file’s metadata.
While the tool is still active move your cursor to another place in your photograph that needs a bit of adjustment: Click, then drag up or down to brighten or darken that area and so on. Just keep in mind that by using this tool if the place you click on is principally red or green or magenta (for example) ALL elements in your photograph that are “Red” or “Green” or “Magenta” will be lightened or darkened at the same time. (This may take a bit of getting used to as you learn to finesse your converted images, but remember: It is nearly impossible for you to “wreck” your files within a raw converter – especially if you work with Lightroom where you have the unique feature of its History record always available to you for selective back-stepping!)
You could also do just fine working primarily with the settings sliders found in the ‘Basic’ panel; then perhaps add a Split Toning effect and Grain to more-simulate a toned, B&W “silver gelatin” print. The possibilities are endless.
Just get into the habit to Snapshot the most important tweaks and changes you make to your images as you process them here in Lightroom. No big rush; you have the luxury of its ‘History’ record of all your work so you can go back after a flurry of adjustments and reconsider just what is “important” for you to save – and label DESCRIPTIVELY – as a snapshot. NOTE: If you transfer your photos to another drive or later convert from your camera’s original proprietary Raw file format to DNG (say “CR2” or "CRW" for Canon or “NEF” for Nikon to ‘DNG’) you will lose all your processing history in that conversion – but not your saved Snapshots!
You can reset your image to the original full color photograph your camera made when shot as a Raw file capture by pressing the "Color" setting in the 'Treatment' drawer. You've got options! That's just part of the beauty of getting into the habit of shooting Raw. (Ooh lah-lah!)
For additional information on how best to affect images that have been converted from color to B&W inside Lightroom have a look at the page provided by Pearson/Adobe Press – an excerpt from Martin Evening’s “The Adobe Photoshop Lightroom 4 Book, The Complete Guide for Photographers”. With regards to both Lightroom and Photoshop Martin Evening is, in my opinion, the very best at explaining BOTH applications for use by photographers. If, however, you are looking for instruction on how best to use these apps as a "Photoshop-ographer" then I would instead direct you to the work penned by “the world’s #1 Photoshop author”.
BACK to the Tips and Tutorials page | email Contact or 1+602-225-2727